Saturday, 21 September 2013

ADF Search Form; Date Search

In this Post we will make a simple Search Form.

But more importantly, we will see how to handle the Date Search on a Date Column. Normally users searche by Date and not Time (e.g., on 19th Sep How many Employees were created). Oracle stores time along with the date in its Date Types. So when a user searches with Date (which by Default has no Time Element so it passes 00:00:00 in the time element) ADF does not pull any records.

Create a table XX_EMPLOYEES and insert following data. Make sure that Time part is not Truncated while inserting the date.


Create a New Web Application with Name as DateSearch and give Prefix as "com.adf.datesearch". Chose default in the Next Screens and Finish. 

Right Click on Model and Chose "Business Tier" -> "ADF Business Components" -> "Business Components from Tables" -> Query for the Table XX_EMPLOYEES -> Click Next -> In Updatatable VO Shuttle the EO to the Right Hand Side -> No Need to give anything in Read Only View -> Keep saying OK but make sure that the View XxEmployeesView is Added to a AM.

Finally the model should look like below:


Now the most Important Part, which is about the Date Search Issue.

An easy to resolve this is to include another column on VO Query and Truncate its time part using Trunc function. Goto VO -> Query -> Open the Query in Expert mode and add another Column name 
trunc(XxEmployees.CREATION_DATE) ONLY_DATE as shown below in the screenshot.


Make sure that this is showing in the Attributes as below:


Right Click on AppModule and Run. Click on XxEmployeesView1 and Click on Search Icon (Blue Binoculars) and give the date on Only Date Prompt and hit Find.


Try the same with CreationDate and you will not get any records.

Now lets build a jsf page. Right Click on the ViewController Project -> New -> Web Tier -> JSF -> JSF Page -> Ok. On the resulting "Create JSF Page" give the Page Name "DateSearchPG.jspx" -> Ok.

Goto DataControl -> XxEmployeesView1 -> NamedCriteria -> Drag "All Queriable Attributes" onto the Page as shown below: 


This will open another Dialog Box to Edit Table. Simply chose Ok. 

Now run the page and Search with OnlyDate and you should get the results you want as shown below. However if you search by CreationDate nothing will show.


Note: For every VO Created, JDeveloper Automatically Create a Default "View Criteria" using all Queriable Attributes on a VO. Since All the Attributes by default are queriable so in the Query Component you will see all. Since the search is not done on IDs and certainly not on ROWID you can goto the XxEmployeesView.xml and change the ROWID, CreationDate, EmpId to non queriable.


Edit OnlyDate Attribute and change the Label to "Date Created" in Control Hints as shown below:


Run the page and do some Search on Date as shown below:

Friday, 20 September 2013

Hello World in ADF

With Java Basics up your sleeves, you are ready for the "Hello World" of ADF. We will create a Page with an Input Text and a Button.

Activity: We will create a Page with an Input Text with label Name and a Button. On pressing the button message will appear on the top of the Page greeting the user.

The final page should look like below:


Create a "Fusion Application" with name as Hello, chose default values which will create a Model and ViewController project as below.


Now lets create a page on which we will create an InputText and a Button. Right Click on ViewController ->Web Tier-> JSF Page. Enter the name as HelloWorld and make sure that no Managed Bean is selected as shown below.


On the page drop an OutputFormatted, InputText and a Command Button. The page should look like below:


In the Source View, it should look like below:


Now, we need to handle the event on the button and modify the Output Text programmatically. To achieve that we need to create a Managed Bean which is used to gain access (and change) to the values on the Page. Select Output Text and chose the Binding property 


Chose Bean Name as MB and Class Name as "HelloManagedBean", package as "com.hello.mb"


Chose property as OutputMessage as shown below:


Similarly create a Binding for InputText. Chose MB as Managed Bean and name as "nameTextArea".
Click Ok and this will create a Class with Getter and Setter methods automatically created which will be used to get and the values programmatically on Button Click.

Now, we have to handle the Button Click event and take the values of Input Text and display the value in Output Text. Double Click the Button and chose MB as managed bean and let Method be cb1_method as shown below.


This value will be set on the Binding of the CommandButton as #{MB.cb1_action}
This will open the Managed Bean, type the following code in the method cb1_action 

    public String cb1_action() {
        // Add event code here...
        
        RichInputText helloString = getNameTextArea();
        outputMessage.setValue("¡ Hola "+ helloString.getValue().toString() +" !");
        
        return null;
    }


Here is the Screenshot for reference.


Now run the page.

Wednesday, 17 July 2013

Deleting Multiple Rows in a Table

We will try to accomplish a frequent requirement, which is deleting multiple rows from a table. Now a delete operation is available out of the box on a Data Control; but that can only be used to delete 1 row at a time.

Deleting multiple rows can be done in 2 simple ways.
  1. Create a Check Box inside a column to determine if a row is selected to delete. Create a Command Button which will handle delete operation programatically using an Action Listener.
  2. Create a multiple row selectable table. Create a Command Button which will call a Java Program to identify the selected Rows and delete then programatically.
This Tutorial will show how to delete multiple Rows in a table using check-box. We will create a check-box in a table and then write Java code in the Action Listener of the Command Button.

Create an Application named "DeleteMultipleRows"; give any suitable Package Prefix


Keep pressing Next with default values to create Default "Model" and "ViewController" projects in the application. Right Click Model and chose New-> BC4J -> Select the HR DB Connection on XE.

In the next screen chose Employees table as shown below

In the next screen (Updatable View Objects) shuttle the EO to the right and change the name to "EmployeesVO". Press Next. Don't do anything in Read-Only View Objects. Press Next. In the Application Module section chose the default Values of Package and AM Name (although you can change it as well).

Now lets validate if our Application Module is created correctly by running the Application Module. In ADF, this is a very nice feature which will allow the user to see the values shown by the DB through AMs.

Create a Page DeleteEmployeesPG.jspx in "ViewController" project and drop the EmployeeVO1 from DataControl as a table as shown.


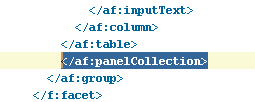
To display Button which will be used to Delete a row, surround the table by "panelCollection". You can easily do it in the source of the page by dragging the panelCollection on the top of "table" tag and then manually cut and paste the </panelCollection> after the table as shown in 2 screenshots below.


(Actually you can first put a panelCollection and then insert a table; its just that I have this bad habit of doing things in a bad way)

Drag toolbar from Component palette and drop it in toolbar facet of panelCollection as shown below. This is done to hold Delete Button.


Drag a button inside toolbar as shown below.


On this button, we will add an Action Listener which is a Java method to delete Rows programatically.
Select the Button Click the down arrow and chose Edit. In the Managed Bean select New and chose values as shown below:


Give method name as delSelectedEmp as shown below


This will create a Java Class with a method named delSelectedEmp which will be called upon Button click.

Now 2 major things are left
a) creating a check-box in the table

The table is based on EmployeeVO; and in order to capture the value of each instance of Check-box in the row we need to create a Transient attribute in the EmployeeVO as shown below:


On the page, add a column from Component Palette and drop at the beginning of the first column as shown below.

Modify the width to 20.
Insert a Check-Box inside the column by Dragging the "Delete-Box" attribute from Data Control and choosing "Single Selection"-> "ADF Select Boolean Checkbox". This will result in a Dialog Box to open. Enter Y for "Selected State Value" and N for "Unselected State Value" as shown below:
Insert an Output Text to the right of the delete button (Inside the Toolbar) which will indicate the No of records deleted. Select OutputBox and add binding. Chose Managed Bean as DeleteEmployee and Click on New and give "deletedEmpCount" in the Property. It should look like below:


The source will look like the below. Note that its bind to a method deletedEmpCount

Add the Commit Operation to the Binding; so that we can commit after removing the records from the Iterator.
Goto Bindings tab on "DeleteEmployeesPG.jspx" -> Press "Add" button under bindings -> Chose "Action" -> Press "Ok". In the resulting window select the "AppModuleDataControl" and in Operation Select "Commit" ->Press"Ok". 

b) writing the code to delete Rows in method "delSelectedEmp".

You can navigate to this method by going to the Source of the page and Ctrl + Double click on "delSelectedEmp". Or Search for DelEmp.java in Application navigator and open the java file. Find "delSelectedEmp" inside this class.

Now, Add the following code in "delSelectedEmp"
        // Add event code here...
        
        BindingContext context = BindingUtils.getBindingContext();
        DCBindingContainer bindings =
                    (DCBindingContainer)context.getCurrentBindingsEntry();
        DCIteratorBinding iterator;
        iterator = (DCIteratorBinding)bindings.findIteratorBinding("EmployeesVO1Iterator");
        RowSetIterator rowSetIterator= iterator.getViewObject().createRowSetIterator(null);
        
        int i = 0;
        int recDeleted = 0;
        while (rowSetIterator.hasNext())
              {
                   Row r = rowSetIterator.next();
                   String firstName =  (String)r.getAttribute("FirstName");
                   String EmployeeId =  (String)r.getAttribute("EmployeeId").toString();
            
                System.out.println("i ="+i );
                System.out.println("EmployeeId ="+EmployeeId );
                System.out.println("firstName ="+firstName );            
                   if(null !=  r.getAttribute("DeleteBox") && r.getAttribute("DeleteBox").equals("Y"))// && ("Y".equalsIgnoreCase((String)row.getAttribute("SelectTr")) ))
                      {
                          r.remove();
                          recDeleted++;
                      }
                    i++;
               }
        getDeletedEmpCount().setValue("Records  Deleted: "+recDeleted);
        OperationBinding comt = (OperationBinding)bindings.getOperationBinding("Commit");
        comt.execute();

We are done. Run this page.

Saturday, 9 March 2013

Java Basics For Oracle Apps Developers 2

Without further ado ... Lets continue ...

Overview: Re-usability, Method Overriding, Method overloading.
Duration: 30 Mins

One of the biggest advantage of Java language is its re-usability. And this is what you will be doing very often in ADF development.

In the last example we saw class called Animal with some methods. If I have to use the same methods I just have to Import that package and simply start using it. As simple as that. (As a matter of fact you don't even have to import it, you can just qualify it with package name; but importing will make your code look good, as you don't have to always write entire package name every time you want to use a method).

Lets see how its done.
Right click on Application Sources and chose Java-> Class Create another Class in a different package. Don't check Constructors and Implement Abstract Methods just as shown below.


Create a main method and start to Animal to create an Object of the Animal class. But since Animal is in a different package system will prompt you to Import the package as shown below (on clicking the Animal).

Press Alt Enter to import. (When you start typing Animal for the first time system may say importing com.tutorial.Animal and will do so without you doing anything)

And when you type "animal." (see screenshot below) in the next line you will have access to all the methods of class "Animal". So, if someone has already written some code, its so easy to import and re-use it. For me this makes Java as cool as it is ;)


So lets go ahead and complete the code as shown below.


Here is the code.

package com.tutorial.catfamily;

public class Lion {
    public static void main(String[] args) {

        Animal animal = new Animal();
        String ani = animal.findAnimalFromSound("roar");
        System.out.println("Reusable from Animal class :" + ani);

    }

}

*Please add "import com.tutorial.Animal" from screeshot above as my system is not allowing to use import for some reason.

Method Overriding

Now lets say that you are not satisfied with one of the method in Animal class (or may be its wrong;). Lets assume findAnimalFromSound should not only return Lion for Roar, it should also return Tiger.

Java enable you to override the existing method.
In Lion class, type extends Animal as shown below.
This will make Lion a Subclass and Animal a Superclass.  Technically, you can even extend Lion (when defining a *cub* class) and use and override all of its methods. This way a Subclass "Inherits" all of the properties of a "Superclass", along with having its own properties (methods and variables).


Create another method findAnimalFromSound with same signature (i.e., 1 String argument and returns String.) This will allow you to "Hide/Shadow" the existing definition of findAnimalFromSound and use your own.


The findAnimalFromSound of this Subclass is said to have "Overridden" the method of the Superclass Animal.
Lets call this method in main and see what it results in. Notice that the function returns "Tiger or Lion".


Now lets turn our attention to Method overloading.
Assuming that you need to find the animal name from Sound, but since both Lion and tiger roar; we need additional attributes to find the Animal, so lets define another method, which will take another argument, lets call it stripes as shown below.

Then try to call it in the main package. It will show Tiger or Lion depending on the argument passed in the second parameter.


To summarize, 
When the method name and signature is same its called Method overriding.
When the method name is same but it has a different signature, its called Method overloading. 

Here is the final code:


package com.tutorial.catfamily;

public class Lion extends Animal {
    public static void main(String[] args) {

        Animal animal = new Animal();
        String ani = animal.findAnimalFromSound("roar");
        System.out.println("Reusable from Animal class :" + ani);

        Lion lion = new Lion();
        System.out.println("Over ridden Roar: " +
                           lion.findAnimalFromSound("Roar"));
        System.out.println("Over loaded Roar: "+lion.findAnimalFromSound("roar", "yes"));
        System.out.println("Over loaded Roar: "+lion.findAnimalFromSound("roar", "no"));
        
    }

    public String findAnimalFromSound(String animalSound) {
        if (animalSound.equalsIgnoreCase("roar")) {
            return "Tiger or Lion";
        } else
            return "Not found";
    }

    public String findAnimalFromSound(String sound, String stripes) {
        if (sound.equalsIgnoreCase("roar") &&
            (stripes.equalsIgnoreCase("yes"))) {
            return "Tiger";

        } else {
            return "Lion";
        }

    }
}


Saturday, 16 February 2013

Java Basics For Oracle Apps Developers 1

Hi All,
My work, personal commitments and lazyness have been trying to kill my blog. I could somehow find time and post another one ;) Hopefully you will like it. I am also trying to create a Category of Blogs "Chapter by Chapter" and link the posts properly so that someone can go in Order. Another would be a Random one where I will Post what I learn so we learn together!!!!

Come Oracle Fusion for e-business Suite; Oracle Apps developers will have to start developing on ADF. The first hurdle which Oracle Apps developers face is Java. PL/SQL, is a procedural language and is relatively simple; so the technological upgrade seems overwhelming and frightening.

Well don't worry, you don't need to be an expert java developer, all you need is Basic knowledge of Core Java. ADF shields you to a great level but you still need to know the Basics. The idea behind this post is not to make you a Java Developer but to enable you with basic knowledge of Java to aid in ADF development.

This post designed to take you from the Hello World (well I have used another program) and some fundamental concepts of Java to enable you to do ADF development.

I am not going to talk about theories of OOPS and Java which generally tend to confuse people. Lets just dive in without worrying too much.

Overview: Creation of Classes and using making use of them through Objects.
Duration: 30 Mins

This is what you will require to do most of the time so you must be familiar with these concepts.
  1. Goto File New in JDeveloper and chose Generic Application.
  2. In the next screen give application name as "JavaTutorial" and Package as "com.tutorial".
  3. Press next and give Project as "AnimalProject" and suttle Java to the right hand side.
  4. Press Next and Finish. Once its done it will look like following.
  5. Now lets start creating Classes and do the real stuff. One can create a Class by Right Click on Project -> New -> General -> Java -> Java Class or from JavaTutorial Overview -> Java Files -> Add (Green Button).

    Don't check Constructor, Abstract Method and Main method and start with a very simple Class. 


  6. You can directly overwrite from below
     
package com.tutorial;

public class Animal {
    /**
     * Prints "Animals move"
     */
    public void move() {
        System.out.println("Animals move");
    }

    /**
     * Finds animal from Sound it makes.
     * Pass Sound name e.g pass Bark and it will return Dog
     */

    public String findAnimalFromSound(String sound) {
        if (sound.equalsIgnoreCase("Bark")) {
            return "Dog";
        } else if (sound.equalsIgnoreCase("Roar")) {
            return "Lion";
        } else
            return "Sorry! Could not identify the sound. Try another search!!";
    }
    
    /**
     * Finds Sounds from Sound it makes.
     * Pass Animal name and it will return the sound it makes
     */

    public String findSoundAnimalMake(String animalName) {
        if (animalName.equalsIgnoreCase("Dog")) {
            return "Bark";
        } else if (animalName.equalsIgnoreCase("Lion")) {
            return "Roar";
        } else
            return "Sorry! Animal not identified. Try another search!!";
    }
}
So, lets analyze the class and some fundamentals

  • Name of the file should be same as that of class name.We created a class names Animal in package com.tutorial.There will be a file with same name Animal.java in the file system. To confirm Goto Tools -> External Tools -> Select -> All and OK.


    At this time we are particularly concerned with "Explore Directory" which will take you to file on file system. Right click on Animal.java in the Navigator and click on "Explore Directory". It will take you to Animal.java on file system. This confirms that the java file name is same as the class name. At this point if you want to change the class name ADF will show an error.  
      • A Java file can have multiple classes but for all the practical purposes lets just say that it will only have one class. JDeveloper will prompt a warning if you try to add another class.
        • A class can have many methods (similar to Oracle PL/SQL functions), which may or maynot return any value back to calling function. In this case, we have three methods
          • move which just prints "Animals Move". The return type is void which means it will not return anything. There is no input arguments (also called parameters)
          • findAnimalFromSound which takes one argument of type String and returns String. As the name suggests this method will find the Animal if you pass the sound.
          • findSoundFromAnimal which is simlar to above but the functionality differs as it returns the name of Sound Animals make
          • System.out.println is equivalent to dbms_output.put_line and is very useful for quick debugging (Though ADF provides excellent debugging framework out of the box).
            • Something about code comments: There are mainly three types of comments one can put in java code.
              • Single line (by using // at begining of the line). This is used for commenting single line
              • Multi-line (Start with /* and end with */). Whatever comes in between /* and */ is commented.
              • Documentation comment Starts with /** and ends with */ . This is important to use this comment at the starting of each method. One can use Multi-line as well; but using documentation on the methods will make sure that when you are using the method in another class; ADF will display your comments. We will see that in a bit when we create another class TestAnimals.java to test the functionality of class "Animals.java".
              • All methods are also declared public meaning it can be called from anywhere.

              So, can we run this class. NO; not just yet. Execution in Java begins with main method; since there is no main method we cannot run this. To see the use lets create another class TestAnimals.java.

              Just like earlier Right Click on com.tutorial and create Java class. This time give name as TestAnimals.java

              You may like to add the following code

              package com.tutorial;
              
              public class TestAnimals{
                  public static void main(String[] args) {
              
              // Instance of Animal Class (Object a) to Get Animal Name from sound
                      Animal a = new Animal();
                      a.move();
                   
                      String animal=a.findAnimalFromSound("ROar");
                      System.out.println("Roar = Sound of "+animal);
                      
                      animal = a.findAnimalFromSound("bark");
                      System.out.println("Bark = Sound of "+animal);
                      
                      animal = a.findAnimalFromSound("Chirp");
                      System.out.println("Chirp = Sound of "+animal);
              
              // Another instance of Animal (Object b) to Get Sound From Animal example
                      Animal b = new Animal();
              
                      String sound=b.findSoundAnimalMake("Lion");
                      System.out.println("Lion's Sound: "+sound);
                      
                      sound = b.findSoundAnimalMake("Dog");
                      System.out.println("Dog's Sound: "+sound);
                      
                      sound = b.findSoundAnimalMake("Bird");
                      System.out.println("Bird's Sound:"+sound);
                      
                  }
              }
              

              You might have heard people taking about Object and class in Java.
              Where does object come into picture?
              Simply put "Object is an Instance" of a class. In the example above Animal is a class and variable "a" and "b" are the Objects of the class. So a and b will be the Objects.

              Objects are create like below
                      Animal a = new Animal();
              Its a good practice to seperate the declaration and assignment like the below
                      Animal a;
                      a = new Animal();

              The statement "Animal a;" declares a object of type Animal. But it will not have any memory assigned to it. That will only be done with a = new Animal();

              Right click and run TestAnimals.java and you will see the results just below the code.


              Oh yeah about Documentation comments. Just goto TestAnimals and type "b." and chose any method from Animals class; you will see the documents right up there. Dont have to goto Animals.java. See below. I think its cool and good pratice to include Documentation Comments.


              This conclude our first Java Tutorial; this was pretty easy but its very important that you get a hang of things (try to type rather than just copying the code).

              I will post another one on Core Java explaining some other concepts (ofcourse with examples) like Method Overloading, Overriding etc.. and then we will be good to go.

              Until then happy Coding.