Sunday 1 November 2015

ADF BC: Part 4: Search Form. Absolute Basics

          In the last posts, we saw how to build simple LOVs and Cascading LOVs declaratively, without writing any code. In this post we will see how to build Search form using ADF BC.
Search forms are one of the most common requirement that we come across. ADF BC implement it using View Criterias on a VO. 
           The advantage of such an approach is that you can have many search criterias on the same VO, e.g., one can search by All the searchable fields of an Employees VO, or By Manager's Name or Employee's Name or by Hire Date etc....


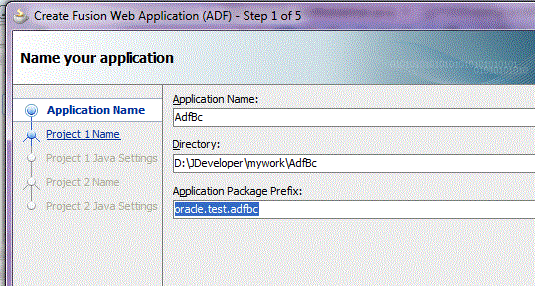
Just breeze through the wizard by pressing Next until 2 projects Model and ViewController are created as below:


Now right click on Model project and invoke the "Create Business components from Tables" wizard. Chose the HR connection and select the Employees table.


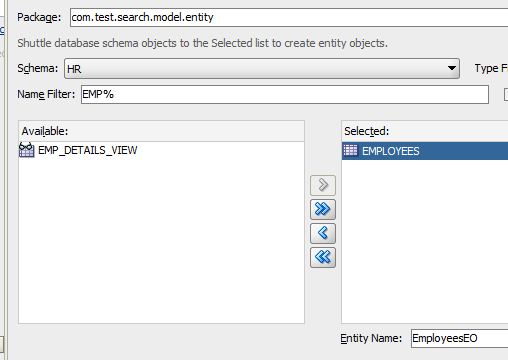
Create EmployeesVO in the Entity-based View object


No need to select the Read only VO. Chose the default setting on Application Module. Keep clicking next and Finish. Finally the Model should look like below:


Now create a jsf page. Right Click on ViewController -> New -> "Page" as shown below:


In the next screen give FileName as SearchEmoployee.jsf (Even if you chose .jspx in 11g it should not give any issues).


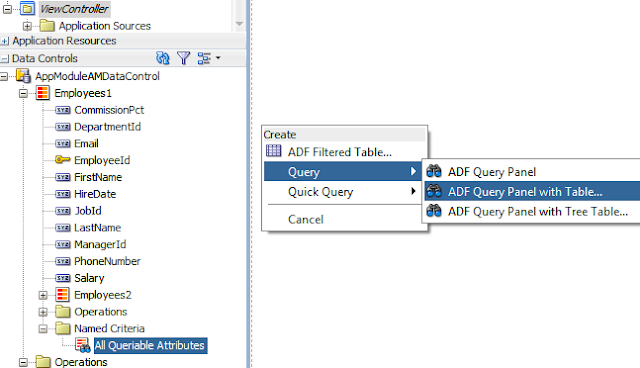
Now goto the Data Control and Drag and Drop the "All Queriable Attributes" onto the page. From the resultant popup chose Query -> ADF Query Panel with Table.


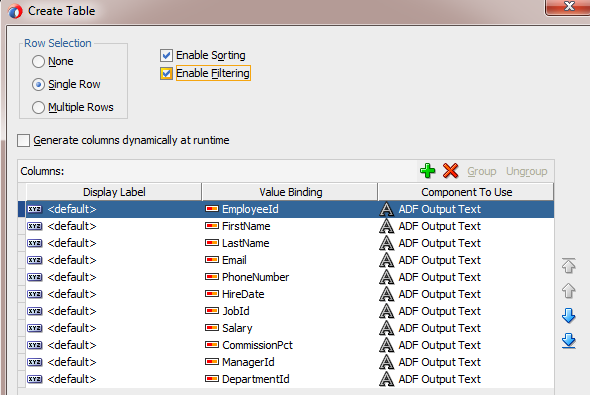
This will bring "Create Table" screen where you can select what all columns to be displayed onto the Table. You can also chose if you should only allow "Single Row" or "Multiple Rows", Filter and sorting option.


Just run the page. It should show like below:


Try following things to get a hang of the Search Form and table. 
a) Press on Search and it should give all the rows. 
b) Give values on the filters and press ENTER to filter the values. 
c) Hover over the column and you will see Sorting icons.
d) Press on "Any" and give multiple search fields to see that it acts like an "OR" condition.


e) Click on Advanced button and see how many options appearing like Contains, Is Blank etc.. You can also see Add fields to achieve OR condition on 1 column. Eg., find employees with Id 100 or 101 or 102...


This was absolute Basic of the Search capabilities of af:Query component. Its likely that you are almost never going to use this in its default form.

We can a lot of things with af:query like:
a) Execute Search by default.
b) Creating Other Query Criterias like Search By First Name and Last Name etc...
c) Making use of "Selectively Required" which means one of the fields must be given.
d) Making Search field Mandatory.
e) Removing Search fields while running.
f) Arranging fields in the Query Region.
and a lot more...


Please note this application is Done on 12c. 12.1.2 version. The steps should be similar on 11g as well.

Saturday 8 August 2015

Changing Heap Space, Perm Gen Space for ADF Applications

Hi All,
This is a short blog explaining on how to quickly get rid of Out of Memory errors while running application.

There are times when your application fails with the Out of Memory Heap Space error or Perm Space error. This can get quite annoying as you will have to do JDev restart. One can increase the size in the setDomainEnv.cmd file which can be found under following directory:

C:\Users\<user-name>\AppData\Roaming\JDeveloper\system12.1.2.0.40.66.68\DefaultDomain\bin

Or just type %AppData% from the Start icon will take you to Roaming folder.

Open file setDomainEnv.cmd in Notepad
and modify like the line below in bold

@REM IF USER_MEM_ARGS the environment variable is set, use it to override ALL MEM_ARGS values

set USER_MEM_ARGS=-Xms2048m -Xmx2048m -XX:PermSize=2048m -XX:MaxPermSize=2048m

if NOT "%USER_MEM_ARGS%"=="" (
set MEM_ARGS=%USER_MEM_ARGS%
)

Once you are done with your changes it should look like below. In my case the applications that I run is pretty huge so I prefer the 2GB of Heap Space and Perm Gen space each. You can set this according to your needs and memory availability.


So, how does one verify whats the actual value set in the JVM. It simple, when you run any application the Memory arguments are printed in the console as below:


Enjoy Learning!!

Sunday 23 March 2014

ADF BC: Part 3: LOV 2: Cascading / Dependent LOVs

In the Last Post we saw how to create LOVs declaratively. This is one cool feature of ADF framework. In this post we will take the concept to a different level altogether in implementing Cascading or Dependent LOVs.
Take example of filling out an address form online which has Country, State and City. List of States depends on the Country chosen and the List of Cities depends on the State chosen. If you change Country then both the State and City LOV should refresh to see new Values. If State is changed then the City LOV should refresh to show the list of cities corresponding to that State.

This is all done declaratively, so Props to Oracle for implementing such an amazing feature out of the Box! Lets see this in all of its glory with an example.

For our example we are using the HR schema of XE Database, however I have chosen to create a new table and inserted some values

CREATE TABLE ADDRESS_MASTER
AS
SELECT DISTINCT COUNTRY_ID, STATE_PROVINCE,CITY
FROM LOCATIONS;

You should have your Locations in the XE database in HR Schema.

This table would have all the list of Countries, State and Cities.
I have also created another table which will hold the address user enters:

CREATE TABLE ADDRESSES 
(
  ADDRESS_LINE_1 VARCHAR2(100 BYTE) 
, ADDRESS_LINE_2 VARCHAR2(100 BYTE) 
, COUNTRY_ID VARCHAR2(20 BYTE) 
, STATE_PROVINCE VARCHAR2(100 BYTE) 
, CITY VARCHAR2(100 BYTE) 

Continuing with the same project as the last post, lets invoke the Business Components Wizard and create a EO AddressesEO and an updatable VO AddressesVO.

Now Lets create separate VOs for Country, State and City. Lets create them individually as we will have to modify the Query.
Right click on uiview and create a Read Only VO for Country as shown below:


In the next screen give the Query as below:

select distinct country_id from address_master

Keep clicking next to finish. Similarly create two more Read only VOs for State and City.
Right click on uiview package and create Read Only View with name "StateProvinceVVO". In the sql write the following query:

select distinct state_province
from address_master
where country_id = :p_country_id

In the Bind Variable screen, create a Bind Variable p_country_id:

IMP: Bind variables are case sensitive and it should exactly match the bind variable defined in the Query.

Keep clicking next and finish.

Create another Read Only VO, CityVVO with the following query:

select distinct city
from address_master
where country_id = :p_country_id
and nvl(state_province,'1')=nvl(:p_state_province,nvl(state_province,'1'))

Please note the use of nvl on both sides which is required when there is no State defined.

This time create two bind variables p_country_id and p_state_province as shown below:


Finally the ADF BC components should look like below:

Since we need to add Country, State and City to Address, we will have to create View Accessors on AddressesVO. Open AddressesVO and goto View Accessor and add CityVVO, StateProvinceVVO and CountryVVO as View Accessors as shown below:


Click on CityVVO1 and click on Edit and enter CountryId against p_country_id and StateProvince against p_state_province as shown below.


Similarly for State_Province give CountryId against p_country_id as shown below:


IMP: Please note that when we are giving country_id and the state_province, we are matching that to the value in the AddressesVO. So this should exactly match the Attribute name of the record which is being created or modified, in our case, AddressesVO.

Lets create LOVs for the attributes of AddressesVO. Click on Country_Id of AddressesVO and create LOV with the following configuration:


In the UIHints move CountryId to the right hand side.

Click on StateProvince Attribute and add LOV, chose the configuration as shown below:
Chose StateProvince to the right hand side.

Click on City attribute and do the configuration as shown below:

In the UI Hints move City to the right hand side.

We are all set to run the Application Module (also called Tester). Right click on AppModuleAM -> Double tax on Addresses1 and add new record. Check how StateProvince and City change:


Now that our building blocks for the data is ready we can implement it on a jsf page.

Create a New Page Named RegisterAddress (Right Click on ViewController -> New -> Web Tier -> JSF -> JSF Page, give  the name as RegisterAddress). Drag Addresses1 from DataControl and create as Form->ADF From. In the resulting page, Edit Form Fields, chose Default options click on Ok.

From Operations under Addresses1 (this is important as you would be doing Create and Delete on the Addresses Record) on DataControl, drag CreateInsert and Delete to the top of the form field that you just created. It should look as shown below:


Click on Bindings for the page and it should look like below:


Make sure that CountryId and StateProvince's Auto Submit property is chosen as "true". For StateProvince chose the Partial Trigger as Country Id as shown below:

Similarly, for City, chose the Partial Trigger as Country and StateProvince.


Thats it. Now run the page, and when the page is up Press CreateInsert to create a Record and then enter your values. Change the Country and State to see the values changing.


You might wonder why its required when everything on Tester worked fine. The problem is that the Page does not know the changes done at the ADF BC level (Since they are only loosely coupled). For other fields to be made aware on the changes we have to submit them when they change (thats why Auto Submit for Country and State) and since only the dependent fields have to be made aware of this change (in this case StateProvince and City), the Partial trigger is chosen on the fields which are changed earlier. Thats the reason when you change the Country, both StateProvince and City fields get reset, but when you change the StateProvince only City gets reset.

Please note that, even if you make City's Partial Trigger as only State (instead of Country and State both), this would work fine as changing country would refresh State and that would in-turn refresh City.

Sunday 16 March 2014

ADF BC - Part 2: LOVs

In this short Post we will see how to take advantage of ADF BCs to create LOVs, declaratively without writing any code.

In Employee table there is "Manager_Id" and "Department_Id" columns but no Manager Name and Department Name. Though its great from design perspective, but users will not understand the Ids. So we will have to show the Manager Name and Department Name in a drop down. As you can change your manager through LOVs, technically, it won't be wrong to say that, LOVs will save you from a grumpy Manager (pun intended)..

This is achieved through View Accessors. As the name suggests this allows one View (VO) to be accessed from another View (VO). In this case we are going to access Manager and Departments VO from Employee record. Lets see how to define View Accessors.

Goto EmployeesVO.xml -> View Accessors -> Click on Add and move both DepartmentVO (to get Department Name) and EmployeesVO (to get Manager Name) to right hand side as shown below.


This will create 2 View Accessors "DepartmentsVO1" and "EmployeesVO1".

Lets define Manager's LOV.
Now click on Attributes under EmployeesVO and click on ManagerId and then Add the LOV. This will open a dialog box titled "Create List of Values". In the List Data Sources give EmployeesVO1 and chose EmployeeId under List Attribute. Doing this you matched the Manager Id of the base EmployeesVO to the EmployeeId of the View Accessor's VO. Now click on UI Hints and chose First Name and Last Name in the Display Attributes. Finally the screens should look like below:


Similarly lets add LOV to DepartmentId also. On the EmployeesVO.xml click on DepartmentId and Click "+" icon under "List of Values" and add "DepartmentsVO1" under DepartmentId under List Attribute. Under UI Hints add DepartmentName as display field. Here both screens should look like below:


We are done, lets run the AM and double click on Employees1 or Employees4 and check the LOVs.


Lets change label to Display Manager Name and Department Name. Goto Employees VO and double click on ManagerId attribute to open Edit Attribute Window, then goto Control Hints" and enter "Manager Name" as shown below.

Similarly change DepartmentId attribute Label to "Department Name". When you run the AM now it will look like below:


This Concludes our chapter on LOV using ADF BC.

Saturday 1 March 2014

ADF BC - Part 1: Basics

In this post I will try to explain one of the most important layers in the ADF Architecture, the Business Service. Nobody explains this architecture better than Oracle. ADF BC (Business Components) layer is one very important way to implement the Business Services (others notable methods being Web Services, BPEL and Java). When you are making applications which interact with database directly, its almost certain that you will be using ADF BC.

For people coming from OAF Background (Oracle Application Framework, which is used for Oracle Apps page development) this is similar to BC4J, Business Component for Java.

So whats ADF BC and how does it help you? Well, in a nutshell it encapsulates your Database Objects, Validations on them, LOVs, handles Primary Key(PK) and Foreign Key(FK) relationships, enables you to build Query Criterias used in Search forms, making master detail forms, and a lot more. You can do all of the above declaratively saving you a lot of precious time in tight schedule projects. Imagine you have to write Java code for all the mandatory columns in a table, implementing FK and PK relationships... you get the idea...

ADF BC implements the above features with the help of EO (Entity Object), VO (View Object), Associations, View Links, Validation Rules etc..

EOs correspond to a Table or a View; but it Must have a Primary key, if there is no Primary Key it will use ROWID as a Primary Key.

VOs corresponds to a Query, it can be a Read Only or Updatable VO. Updatable VOs are based on EOs so that the underlying data can be modified. Rule of Thumb: If your intention is to Create,Update or Delete the records use Updatable VO else you can use Read-Only VO.

Associations are used to make relationships between two EOs e.g., a 1-* (1 to Many) , 0..1 - * (0..1 to Many). If there is a FK relationship between 2 tables, this relation is automatically created (when both the EOs are created at the same time using "Business Components from Table" Wizard).

View Links use the Association of underlying EOs to relate the VOs. In Short, View Link is to VOs what Association is to EOs.

Application Module holds various VOs and View Links which are used to display data to the user. But as DML operations can only be done through EOs, the work of Updating the Database is delegated by VOs to the EOs. Application Module holds the transactions together for all the DML operations on any/all of its VOs. It acts like a boundary for your transactions. You can issue commit, rollback on a Application Module to commit or rollback the changes on all the VOs. One of the main feature of Oracle ADF is that you can run its Application Module even without building a web page. As you can guess this is used to check if the problem is with the Data or Page or Bindings.

Time for some Action now:

Create an Fusion Application "AdfBc" in the package "oracle.test.adfbc" as shown below:

Keep clicking Next and Finish the project, you should see 2 Projects, Model and ViewController. Basically Model will contain all the ADF BCs components ("Back End" which communicates with Database to maintain the consistent state of the data validations etc) and ViewController will have web pages, controller and bindings, everything related to "Front End", what user sees.

Right Click on Model -> New -> Business Tier -> ADF Business Components -> Business Components from table -> Ok.
In the next screen chose HR Connection which gives access to Employee, Department tables in XE database.


This will invoke another Screen in which you will have to chose the Tables on which you want to base your application on. Search for Employees and Departments table and shuttle them to right hand side and click Next.


Note: We have created them together to take advantage of the PK - FK relationship between the two tables which exists at database level. This also works with multiple tables, so as long as you have the right FKs you don't have to worry about defining Associations and View Links for all of them.

In the "Updatable View Objects" Shuttle both the EOs to the Right Hand Side as we may want to Update any of these tables and click Next.
Notice, How the name is changing as automatically to EmployeesVO and DepartmentsVO (this is because of the property set in).

In "Read-Only View Objects", don't do anything, just click next. In the Application Module chose the default values and click Next -> Again Next and Finish. Finally the Model should look as shown below.


Notice how Associations and View Links are created even though we did not create them explicitly. This is because of the Foreign Key. Lets take "EmpDeptFkAssoc" as an example. Double click on "EmpDeptFkAssoc" -> Relationship -> Press the Edit Icon to open the following screen


Automatically 0..1 to * cardinality is created. If Employees.Department_Id column was a Not Nullable column it would have created 1 to * cardinality.

Check what all VOs have been added in Application Module. It should look similar to below:


Please note that Employees3 is under Department1 as in Master Detail relationship. Click on "AppModule" on the right hand side, click on EmployeesVO on the left and shuttle to the right to create Employees4. This should look like below:


Right Click on the "AppModuleAM" on the "Run". Double click on Departments1 to see following screen.


Now Double click on "EmpDeptFkLink1" to bring a Master detail like Form as shown below.


Now Click on Employees3 to bring Following screen.


Please note that on Employees3 there is Just 1 record. This is because this Employee record is a Subset of Department Non 10, which only has 1 record. Even if you search for another Employee by clicking on Find you will not get any records except for Employee No 200.

To search any employee we will have to Double click on Employees4. You can see all the Employees.
So, needless to say that when you are building a Master Detail Form you will have to use Employees3, if you are building an employee search Form to select all employees you would need Employees4.

Notice how the records change in the Detail table when one navigates the Master Table. In the first Departments1 navigate to any Department with help of arrows and notice how records in "EmpDeptFkLink1" and "Employees3" change accordingly.

This was just a warmup exercise, next we will see how to take advantage of ADF BCs to create LOVs, Validations, Master - Detail Form, Search Form etc.

Saturday 21 September 2013

ADF Search Form; Date Search

In this Post we will make a simple Search Form.

But more importantly, we will see how to handle the Date Search on a Date Column. Normally users searche by Date and not Time (e.g., on 19th Sep How many Employees were created). Oracle stores time along with the date in its Date Types. So when a user searches with Date (which by Default has no Time Element so it passes 00:00:00 in the time element) ADF does not pull any records.

Create a table XX_EMPLOYEES and insert following data. Make sure that Time part is not Truncated while inserting the date.


Create a New Web Application with Name as DateSearch and give Prefix as "com.adf.datesearch". Chose default in the Next Screens and Finish. 

Right Click on Model and Chose "Business Tier" -> "ADF Business Components" -> "Business Components from Tables" -> Query for the Table XX_EMPLOYEES -> Click Next -> In Updatatable VO Shuttle the EO to the Right Hand Side -> No Need to give anything in Read Only View -> Keep saying OK but make sure that the View XxEmployeesView is Added to a AM.

Finally the model should look like below:


Now the most Important Part, which is about the Date Search Issue.

An easy to resolve this is to include another column on VO Query and Truncate its time part using Trunc function. Goto VO -> Query -> Open the Query in Expert mode and add another Column name 
trunc(XxEmployees.CREATION_DATE) ONLY_DATE as shown below in the screenshot.


Make sure that this is showing in the Attributes as below:


Right Click on AppModule and Run. Click on XxEmployeesView1 and Click on Search Icon (Blue Binoculars) and give the date on Only Date Prompt and hit Find.


Try the same with CreationDate and you will not get any records.

Now lets build a jsf page. Right Click on the ViewController Project -> New -> Web Tier -> JSF -> JSF Page -> Ok. On the resulting "Create JSF Page" give the Page Name "DateSearchPG.jspx" -> Ok.

Goto DataControl -> XxEmployeesView1 -> NamedCriteria -> Drag "All Queriable Attributes" onto the Page as shown below: 


This will open another Dialog Box to Edit Table. Simply chose Ok. 

Now run the page and Search with OnlyDate and you should get the results you want as shown below. However if you search by CreationDate nothing will show.


Note: For every VO Created, JDeveloper Automatically Create a Default "View Criteria" using all Queriable Attributes on a VO. Since All the Attributes by default are queriable so in the Query Component you will see all. Since the search is not done on IDs and certainly not on ROWID you can goto the XxEmployeesView.xml and change the ROWID, CreationDate, EmpId to non queriable.


Edit OnlyDate Attribute and change the Label to "Date Created" in Control Hints as shown below:


Run the page and do some Search on Date as shown below: